Originally Posted by
jackdarktemplar

YESH!
Aha alright alright alright. I installed mine a while ago, so it should work, but I am sorry if something gets smudged And mods please feel free to put this in a spoiler or something, I couldn't figure it out, my bad, it's a bit of a chunk of text.
SO- What you need before starting
GPU: NVIDIA with 8 GB VRAM minimum, 12 GB or more is comfortable. Check with dxdiag (Win + R, type dxdiag, hit Enter, look at the Display tab) if you don't know what you have.
AMD/Intel GPUs: technically possible but a different install path and roughly half the speed. This guide is NVIDIA only, sorry 
Disk: ~25 GB free, on an SSD if at all possible. The model file is loaded into VRAM on first generation, and a spinning hard drive will make that take 30+ seconds every cold start. If you're still using a HDD then you probably shouldn't be reading this.
Windows 10 or 11.
Latest NVIDIA driver from nvidia.com. Game Ready or Studio, either is fine. Most weird CUDA errors trace back to a driver that's a year old, so do this first even if it feels unnecessary.
git is also required, grab it from https://git-scm.com/download/win, install with all defaults.
For RAM, it's genuinely hard to say. Your computer might stroke out if you have less than 32GB. If so, it may require increasing your page file, which I will not go over because that's an easy way to screw peoples stuff up, all of this stuff I'm going over is at least easily reversible.
If you have all of that, you're ready. You do not need to install Python, CUDA Toolkit, or anything else manually. The portable build of ComfyUI ships its own.
Step 1: Install ComfyUI Portable
Open https://github.com/comfyanonymous/ComfyUI/releases in your browser.
On the latest release, download ComfyUI_windows_portable_nvidia.7z. It's at the bottom of the release notes under "Assets". The file is ~1.5 GB.
You need 7-Zip to extract it. Windows can't open .7z natively. If you don't have it: https://www.7-zip.org, install with defaults.
Right-click the downloaded .7z file -> 7-Zip -> Extract to "ComfyUI_windows_portable\".
Move the extracted folder somewhere with disk space. A path like X:\ComfyUI_windows_portable\ works well.
Avoid:
Anything inside Program Files (permission issues when ComfyUI tries to write logs)
OneDrive folders (OneDrive will try to sync 20 GB of model files and break things)
Paths with spaces or special characters (some custom nodes choke on them)
What you should see inside the folder:
ComfyUI_windows_portable\
ComfyUI\ <- the actual app and where models go
python_embeded\ <- the bundled Python, don't touch this
run_nvidia_gpu.bat <- launcher you'll use every time
run_cpu.bat <- ignore this unless you have no GPU
Test: double-click run_nvidia_gpu.bat. A black command-prompt window opens and logs scroll past. After 10-30 seconds, a browser tab should open at https://127.0.0.1:8188 showing an empty workspace. Hopefully.
If the window opens then closes instantly: something crashed. Open a regular cmd window, drag the .bat into it, hit Enter. Now the window stays open and you can read the error. Usually it's a missing driver.
If the browser doesn't open by itself: that's fine, just open it manually to https://127.0.0.1:8188. To reiterate as well, this is not 'online' by any means, this is simply the visual UI 'console' of your local server instance
Once you see the empty graph, close the browser tab and close the cmd window.
Step 2: Install ComfyUI Manager
ComfyUI itself only ships with the core nodes. Manager is the addon installer that lets you install extra node packs from a UI instead of running git commands. You only really need one extra pack later (for GGUF), but you'll want Manager around regardless. ComfyUI is super cool and isn't only just for making porn, basically the main pathway for using AI models. The ComfyUI Manager helps bridge the gaps.
Open File Explorer and navigate to X:\ComfyUI_windows_portable\ComfyUI\custom_nodes\. This folder currently has one or two example folders in it.
Click in the address bar at the top of the explorer window, delete the path (Backspace everything out), type cmd, and hit Enter. This opens a command prompt already inside that folder, which saves you from typing cd paths.
Paste this and hit Enter:
git clone https://github.com/ltdrdata/ComfyUI-Manager.git
Close the cmd window. If git was unrecognized, go back to the earlier step and make sure you have git.
Next time you launch ComfyUI, you'll see a Manager button in the right-hand sidebar. If you don't, the clone went into the wrong folder. Check that X:\ComfyUI_windows_portable\ComfyUI\custom_nodes\ComfyUI-Manager\ exists.
This next part is kind of complicated, but bear with me since it's important.
Step 3. This is the heart of the whole setup. AIO stands for "all in one" and that's exactly the point. Instead of separately downloading a 9 GB diffusion model, a 7 GB text encoder, a 300 MB VAE, and a 400 MB Lightning LoRA (which is the standard Qwen-Image-Edit workflow, and is what makes most tutorials painful), one person bundled them into a single checkpoint file. You load one file, the workflow is six nodes, generation runs in 4 steps. Ridiculously massively easier than the other BS that 95% of tutorials force you through.
Go to https://huggingface.co/Phr00t/Qwen-Image-Rapid-AIO/tree/main
Pick a model file. Here's the part nobody explains correctly: file size on disk is not the same thing as VRAM usage. ComfyUI offloads weights between VRAM and system RAM as it generates, so a 26 GB model can run on 8 GB of VRAM just fine. The tradeoff is speed, not whether it runs at all. So pick based on the quality/speed balance you actually want. You CAN still overload it and cause it to crash, ComfyUI can only do so much if you're trying to essentially squeeze a square block through a round hole. Yeah you can get some of it, but push TOO hard and something might break, and it wont fit right either way.
Variant Size = What you actually get
Full fp16/bf16 .safetensors ~26 GB = Highest quality. On 8 GB VRAM + 32 GB RAM it works fine but generations take 30-90 sec. On 16 GB+ VRAM it's fast and clean.
fp8 .safetensors ~13-16 GB = Nearly identical quality to fp16. If you have a 40-series or 50-series NVIDIA card, this is the one to grab. Those GPUs have native fp8 acceleration, meaning fp8 actually runs faster than GGUF at the same quality on your specific hardware.
Q8 GGUF ~10-12 GB = Quality drop from fp16 is basically invisible. Good middle ground if you're on a 30-series or older.
Q6 GGUF ~8-9 GB = Still very good. Sweet spot for 8 GB VRAM users who want generations in the 10-20 sec range instead of a minute+.
Q5 / Q4 GGUF ~6-8 GB = Noticeable quality loss starts here, especially on fine details like text in images or small faces. Only worth it if you're VRAM-starved AND RAM-starved.
There's an SFW and an NSFW v23, the file structure is identical either way. Pick whichever fits your use.
Click the filename to open the file page, then click the download arrow icon on the right side of the page. Do not right-click -> save link, HuggingFace serves these through a redirect and that method gives you a 1 KB HTML file instead of the model.
Once the download finishes (this takes a while, 10-30 minutes on a decent connection, longer for the 26 GB version), move the file to:
X:\ComfyUI_windows_portable\ComfyUI\models\checkpoints\
How big should you really go?
Short answer: if you have >32GB of system RAM, you can run any of these regardless of VRAM. ComfyUI's offloading has gotten genuinely good in the last year or so, to the point where running the full 26 GB model on a lower-tier 50 series with <8 GB VRAM is totally usable, you just wait a bit longer per image. The largest issue comes down to time.
If you have 16 GB of system RAM, stick to the fp8 .safetensors or a Q6/Q5 GGUF. The full version will technically load but it'll start hammering your page file and slow to a crawl.
If you have less than 16 GB system RAM, you're in "Q4 GGUF and pray" territory and honestly might want to upgrade your RAM before bothering with local image gen at all.
Another small distinction;
.safetensors vs GGUF
.safetensors is the standard format. Loads with the default Load Checkpoint node, no extras needed. The fp8 variant specifically gets hardware acceleration on RTX 40-series and 50-series cards.
GGUF is a quantized (compressed) format originally from llama.cpp, adapted for image models. Smaller files, lower VRAM pressure, slightly lower quality at the same compression level. Requires the ComfyUI-GGUF custom node (Step 4 below). If you grabbed a GGUF, put it in the same checkpoints\ folder, the GGUF loader will see it there.
So if you're on a 40 or 50-series card, fp8 .safetensors is better than the equivalent GGUF. On older cards (30-series and below), GGUF wins.
If the file is under 1 GB when it should be 8+, you got a redirect HTML page instead of the model. From what I remember the Phr00t repo doesn't require a HuggingFace login, but if that changed at some point, just make a free account and try again. Either way, it's free.
Step 4: Install the GGUF loader node (only if you downloaded a GGUF)
Skip this entire step if you grabbed a regular .safetensors file.
Double-click run_nvidia_gpu.bat to launch ComfyUI.
Once the browser tab loads, click the Manager button in the sidebar.
Click Custom Nodes Manager.
In the search box, type GGUF.
Find ComfyUI-GGUF by city96 in the list. Click Install.
When it finishes, a Restart button appears at the top of the Manager. Click it. The browser will reconnect on its own after about 15 seconds.
If Manager throws a network error during install: your firewall or VPN is blocking it. Try once with VPN off. If still failing, do the manual git clone instead: same process as Step 2 but with git clone https://github.com/city96/ComfyUI-GGUF.git.
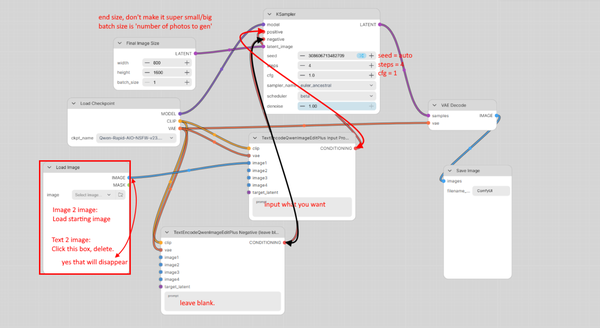
Step 5: Load or build the workflow
You have two options here. Option A is faster, Option B teaches you what's actually going on, which helps when something breaks later. Either is fine for a first run.
Option A: Use the bundled workflow
Many AIO model pages include a workflow.json example. Phr00t usually does. Look on the HuggingFace page for a file with "workflow" in the name and download it. In ComfyUI, just drag the JSON file directly onto the empty graph area. The whole workflow appears already wired.
One thing to check after dropping it in: click the Load Checkpoint node (or Unet Loader GGUF if it's a GGUF workflow) and make sure the dropdown shows your model file. If it shows "null" or an old filename, click the dropdown and pick your file. This catches 90% of "the workflow doesn't work" complaints. Tip: If anything is highlighted red or giving you an error, it's probably not the right thing, or it's not selected to the right thing.
Option B: Build it by hand
Right-click empty space -> Add Node menu, and add these. Order doesn't matter, wiring does. To wire two nodes, click and drag from an output dot (right side of a node) to an input dot (left side of another node). Same-colored dots connect, mismatched colors won't.
The nodes you need:
Load Checkpoint (under loaders) - or Unet Loader (GGUF) if you went the GGUF route. Pick your Qwen AIO file in the dropdown.
TextEncodeQwenImageEditPlus (under conditioning). This is the Qwen-specific prompt node. It accepts both a text prompt and an optional input image, which is the trick that makes one node handle both text-to-image and image-to-image.
EmptySD3LatentImage (under latent) - only needed if doing pure text-to-image. Set width and height to 1024x1024 or 1328x1328 to start. Bigger = slower and more VRAM.
Load Image (under image) - only needed if doing image-to-image. You'll drop your input image into this node.
VAE Encode (under latent) - only needed if doing image-to-image. Converts the input image into latent space so the sampler can modify it.
KSampler (under sampling). This is the actual generator.
VAE Decode (under latent). Converts the result back to pixels.
Save Image (under image).
Wire it like this:
For text-to-image only:
Load Checkpoint (MODEL out) ----> KSampler (model in)
Load Checkpoint (CLIP out) -----> TextEncodeQwenImageEditPlus (clip in)
Load Checkpoint (VAE out) ------> VAE Decode (vae in)
TextEncodeQwenImageEditPlus (CONDITIONING) --> KSampler (positive in)
TextEncodeQwenImageEditPlus (CONDITIONING) --> KSampler (negative in)
^ yes, the SAME conditioning into both.
AIO doesn't use negative prompts.
EmptySD3LatentImage (LATENT) ---> KSampler (latent_image in)
KSampler (LATENT out) ----------> VAE Decode (samples in)
VAE Decode (IMAGE out) ---------> Save Image
For image-to-image, swap the EmptySD3LatentImage out for the Load Image → VAE Encode chain, and feed your image into the TextEncodeQwenImageEditPlus's image input as well:
Load Image (IMAGE) --> VAE Encode (pixels in)
Load Checkpoint (VAE) --> VAE Encode (vae in)
VAE Encode (LATENT) --> KSampler (latent_image in)
Load Image (IMAGE) --> TextEncodeQwenImageEditPlus (image in)
Why two CONDITIONING wires from the same TextEncode node: the KSampler always expects both positive and negative conditioning inputs, even when you don't have a negative prompt. AIO models are trained to not need negative prompts, so feeding the same conditioning to both just satisfies the requirement without affecting the output.
KSampler settings (this is the part that matters)
These are the AIO-specific settings. They're very different from defaults you might have seen in other tutorials, because AIO models have the speed LoRA baked in, which means they generate in 4 steps instead of 20-30.
Setting Value Why
steps 4 The baked-in Lightning LoRA does in 4 steps what normal Qwen needs 20+ for.
cfg 1.0 At low step counts, anything above 1.0 produces fried, oversaturated images.
sampler_name sa_solver The recommended sampler for AIO. If not in the dropdown, use euler_ancestral.
scheduler beta Pairs with the low step count. simple also works.
denoise 1.00 for text2image, 0.7-0.9 for image2image Denoise 1.0 means "regenerate from scratch". For image2image, lower values stay closer to the input.
seed leave at randomize Each generation gets a new seed unless you fix it.
If you change steps to 20 and CFG to 7 because that's what you're used to, the output will be pure burnt noise. This trips people up constantly.
Also because this is a clusterfuck of information, your end result should literally just be:
Step 6: Your first generation
Click in the TextEncodeQwenImageEditPlus node's text box and type a prompt. Qwen handles natural-language prompts well, you don't need the comma-separated tag style.
Click Queue/run (the big blue button on the right sidebar, or Queue Prompt in older versions).
The first generation will take 1-3 minutes. Most of that is loading the model into VRAM. Subsequent generations on the same model take less time once the model is loaded fully. Usually.
Watch the bottom-right status: it'll show "Loading checkpoint", then a progress bar for the sampler, then a brief pause for VAE decode, then your image appears in the Save Image node.
Output files automatically save to X:\ComfyUI_windows_portable\ComfyUI\output\ with timestamped filenames. ComfyUI will also hold input files as well just so you are aware.
Iterating on a prompt: edit the text, click Queue again. You can queue several prompts back-to-back and they run in order. The queue panel on the right shows pending and completed jobs.
Step 7: Things that will probably go wrong
These are the issues that come up most often, in order of how often they happen.
"CUDA out of memory" / "torch.cuda.OutOfMemoryError"
Your GPU doesn't have enough VRAM for the model you picked. Three options:
Re-download a more aggressively quantized GGUF (Q5 instead of Q8, Q4 instead of Q5).
Drop your output resolution. 1024x1024 uses less than 1328x1328.
Close other GPU-using apps. Chrome with hardware acceleration, video players, games, and even some IDEs will hold onto a GB of VRAM in the background. Restart the PC if unsure.
Output is solid noise, garbage colors, or pure static
Steps and CFG are wrong. Set steps to 4 and CFG to 1.0. Every time. AIO is sensitive to this.
"Node TextEncodeQwenImageEditPlus not found" or red boxes when loading a workflow
Your ComfyUI is older than the workflow expects. In Manager, click Update ComfyUI, restart. If that doesn't fix it, redo Step 1 with the newest release (your models\ and custom_nodes\ folders are safe to copy over).
Loaded a workflow and Load Checkpoint shows "null"
The workflow saved a reference to a model filename that doesn't exist in your checkpoints\ folder. Click the dropdown and pick your actual file. Re-save the workflow afterward (Workflow menu → Save) so it remembers next time.
ComfyUI is unreasonably slow even on a good GPU
Confirm you actually launched run_nvidia_gpu.bat and not run_cpu.bat. The cmd window header will say which.
Confirm CUDA is being used: the first lines of the cmd window output should mention your GPU model. If it says "No CUDA available", your driver isn't installed correctly. Reinstall the NVIDIA driver, reboot.
If a previous generation crashed mid-run, VRAM might still be locked. Restart ComfyUI fully (close the cmd window, relaunch the .bat).
Generation finishes but the image is empty/black
This usually means the VAE isn't connected to VAE Decode. Check that wire. In an AIO setup, the VAE comes out of Load Checkpoint, not a separate VAE Loader node.
"ImportError: No module named 'triton'" or similar at startup
Harmless warning that scrolls past during launch. not used on Windows, ComfyUI handles its absence fine. Ignore.
ComfyUI Manager won't open or shows blank
Update Manager itself: in Manager, click Update at the top. If still broken, the install is corrupted, delete custom_nodes\ComfyUI-Manager\ and redo Step 2.
You closed the browser but the cmd window is still running
That's normal, ComfyUI runs as a local server. Closing the tab doesn't stop it. Reopen the tab at https://127.0.0.1:8188. To fully shut down, close the cmd window. The CMD window is the generation, the UI is simply just.. A UI.
Step 8: Day-to-day use
Launch: double-click run_nvidia_gpu.bat. Wait for the browser to open. That's it.
Updating ComfyUI: Manager -> Update ComfyUI -> restart. Do this every couple weeks or when a new node pack you want needs a newer version.
Multiple workflows: there's a "Browse Templates" option in the Workflow menu with community examples for upscaling, ControlNet, inpainting, video, etc. Most of these need extra model files. The Qwen AIO workflow is unusual in being self-contained.


 Reply With Quote